Showing posts with label playroom. Show all posts

Tuesday, July 17, 2012

The Big Playroom Reveal!

Our playroom has been done for a few weeks now and I truly did intend on posting about the big reveal, but then ... I got tired on bed rest and didn't want to pick it up (it's usually a big mess when the tornado that is Liliana finds her way through it).  Then, I went in to labor.  Then, I had Gloria.  And now, it's time to reveal it ... a month later. ; )

I really do LOVE how this room turned out.  We are in here A LOT.  I wish I could say we're in here more, but we're trying to let Liliana find her independence (something we're working on) so we're trying to encourage her to go in there and STAY in there on her own.  She's fabulous at going in here, getting the loudest toy possible, and bringing it to wherever we are.  However, we want her to be fabulous at playing by herself occasionally too.  I'm not saying we never want to see her, we're simply trying to teach her that Mommy and Daddy don't have to be paying attention to her 100% of the time. 

SO here it is!


These couches are DIVINE.  They're from Walmart and our favorite things about them is just how big they are ... that wall, you can't really tell in the picture, is HUGE.  So these couches filled it up perfectly and they're nice and low to the ground which is VERY baby friendly when they're pulling up!

 Thought it might not necessarily look pretty, the toy storage cubicles were a must.  I tried doing without, but it just didn't work.  We got that at Target and it's great for quick and easy clean up. 

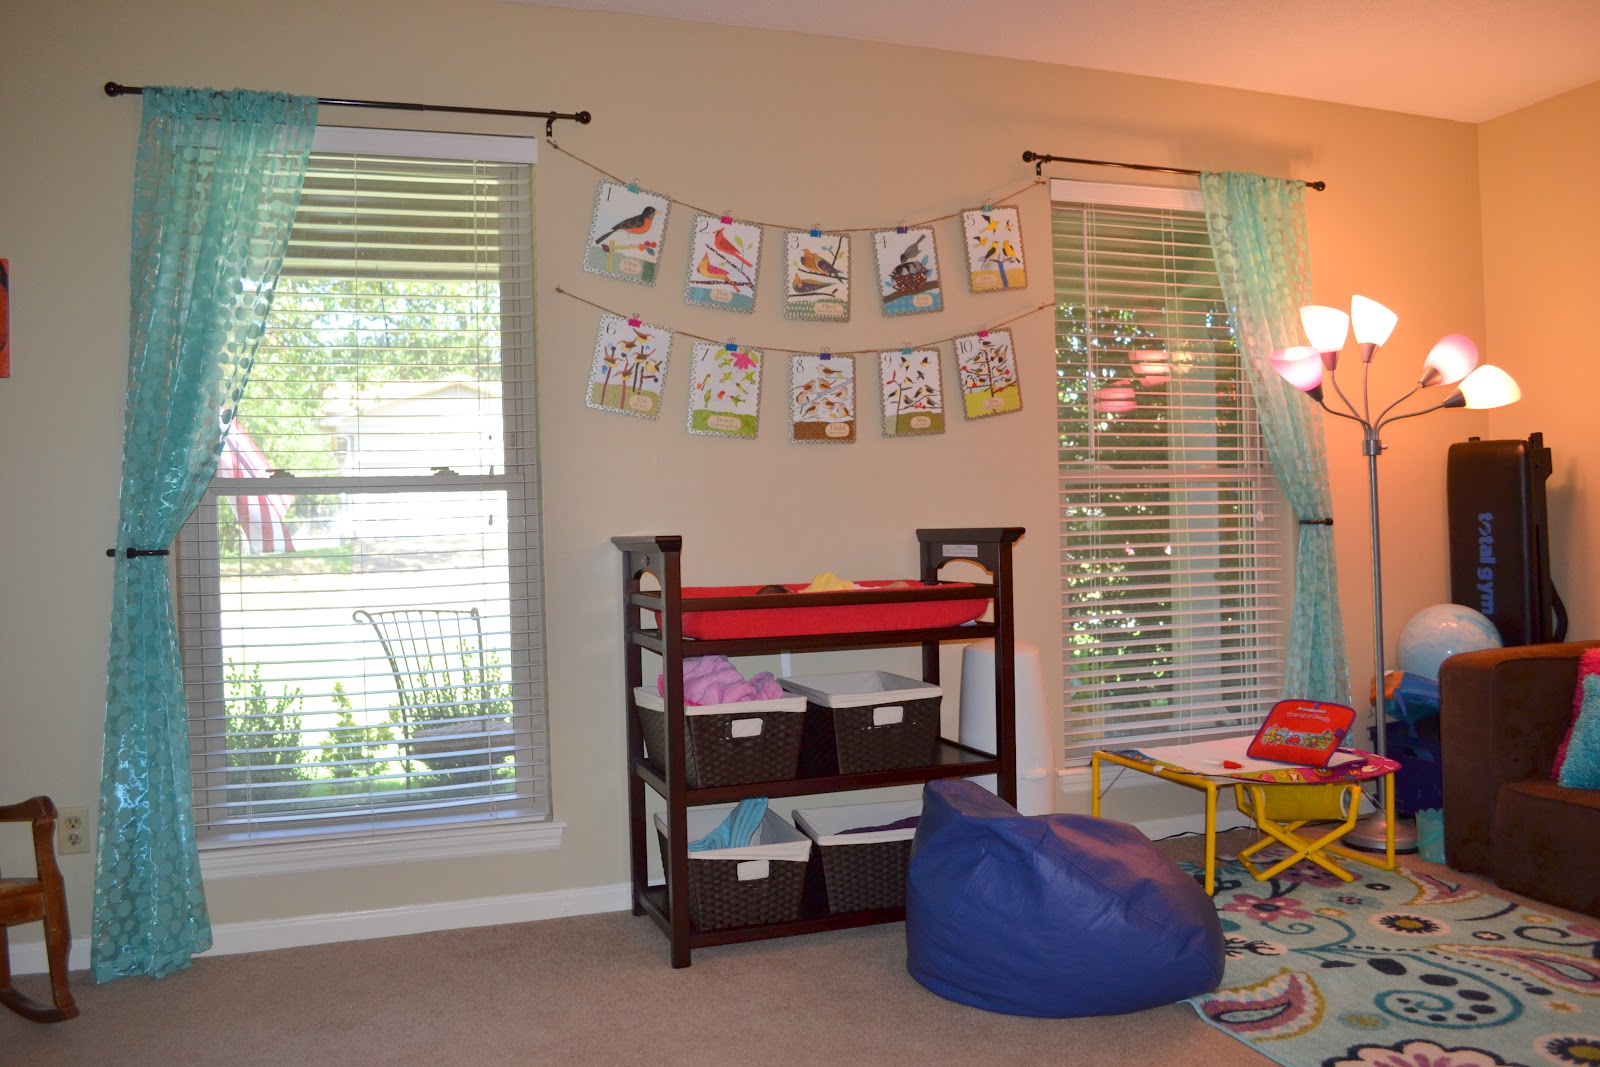
 This changing pad and table was bought at my favorite used baby store in Little Rock.  I got the changing pad, the table, all 4 baskets, and 2 changing covers for $50!  WHAT A STEAL!

This little area is Liliana's favorite.  She LOVES the loud toys standing up there, and she likes her little area behind that curtain.

While this playroom might have been a lot of work, it was TOTALLY worth it to see moments like this ...

 Liliana giving sissy a kiss over the weekend.

 Gloria likes to catch zzzz's in the most adorable way possible.

But she also LOVES opening this gorgeous eyes nice and big for Mommy! : )

Wednesday, April 18, 2012

We've Come a LONG Way

The other day I was feeling pretty down in the dumps in terms of progress we've made on redecorating the house lately.  We have a GREAT time doing it, and it has kind of become our new weekend hobby when Evan is off of work, but I feel like our transformations are underwhelming (is that even a word?) and barely noticeable.

We still have SO many things we'd like to do to the house, but I was feeling a little unispired.  Then I looked back at the before pictures ...

And the inspiration is back!  In 3 short months, we have accomplished quite a lot in our living room, the pantry, the nursery, and the playroom (as evidenced below).  Although not one of those projects is 100% done, is a project EVER completely done?


So before we went any further, I decided to give our realtor a call.  I wanted to know if some of our possible future projects were even worth it!  I thought she would tell me I'm a crazy woman, but she told me she SO wished clients would call before doing renovations. 

She's coming over this evening and I hav esome BIG dream projects i'd like to ask her about.  It would all be DIY, of course, and I'm aware we have little time, but a girl can dream right?  And when you do it on a budget, it makes it all the more fun.  In particular, I'm going to ask her about:

(1) painting the kitchen cabinets white like this photo below (this isn't our kitchen obviously.  It's just inspiration)


(2) redoing the master bathroom (I can't even put an inspiration photo here ... because this one would be a HUGE overhaul)

and ...

(3) changing up the master bedroom (i ordered a very similar pillow off of etsy and this will be the color inspiration for the master.  We're hoping to get some work started on the master before Gloria comes along)


It's exhausting, yet exhilaring, how these projects are never ending!  I have thoughts in just about every square inch of the house.  But don't worry, I still took the time to sit down and be sorely disappointed in last nights Glee instead of worrying over this.  Some of it will get done and some of it won't.  It just depends when inspiration strikes!

Friday, March 23, 2012

Home Renovation Project: Playroom Art Gallery Wall


This week has been BUSY!  Evan was on vacation all week and it has been GLORIOUS! We are taking advantage of this vacation by having family visit all week ... my parents arrived on Friday and left on Tuesday.  Evan's Dad and wife arrived on Wednesday and leave Sunday.  And since we're nice to our guests, we put them to work. ; )

One of the big projects we got done this week?  I finally worked on the playroom art gallery wall!  I only have one project left in that room and it will be done! YIPEE!  I am OH SO HAPPY with the result!

Here's how we got the gallery wall accomplished:

While Evan was working hard planting a tree in our front yard, my Dad and I mapped out the size of the collage wall.  We determined the best looking size would be about 86 " by 36 ".  In other words, a big piece of art. 

I bought everything from the wall at Hobby Lobby. I got unfinished frames to save on money, used 40% off coupons that are ALWAYS available online, and had a heck of a time deciding what to finally buy.  Don't be ashamed to lie everything out on the floor of the store.  I don't care if I looked crazy.  Quite frankly, it helped me see what I would need.  At worst though, buy too much and return some. I know a ton of gallery walls use all white frames but I opted not to do that for a few reasons.  First: I wanted color ... this is a playroom after all!  Second, buying unfinished frame REALLY saves on cash.  The average cost of each frame was $4.00 and with 40% off coupons?  Talk about afordable.  The wall has three 4 by 6's, two 5 by 7's, one 8 by 10, one 12 by 12, one mirror and then the letters.

First I laid the frames out in a pattern that looked pleasing to me.


Then I sat down and painted for about 2.5 hours.  I wrote a W, P, or B on each frame and made sure I had enough variation. 

After I let them dry during Liliana's nap, I put the art and prints in and waited for Evan to come in and hang all the frames and letters.  Let me tell you, this ended up being quite an obstacle because the sticky Scotch wall pieces that we put on each piece WOULD NOT stay on the wall. Literally, by the time he had put everything up, they had all fallen and are all nailed on the wall now. It took patience, and a lot of batting of my eyelashes for Evan not to give up on the project completely. The result though?


LOVE IT! 

As you can see, most of what's highlighted is Liliana's artwork from school! I made a print of "playroom rules" and that is in the top left hand corner.  Here's a close-up of it. 

Here is a view of how it looks in the room! 


I  have a few more projects we did this week to display later on, but for now, I have some shelves to paint!  Gotta love vacation!

Friday, March 2, 2012

Home Renovation Project: Playroom Part II


Last time we mentioned the Home Renovation Project, I shamefully admitted this was the state of our playroom:


The toys were all in the office and the actual playroom?  Well, it had the new coat of paint on the walls, and that was about it.

Today, we're not done by ANY means, but we have ... well .. a PLAYROOM!


As you can see, the couches have officially found their spot and are a sectional (something I've always dreamed and desired in a home ... I just LOVE sectionals).  I also decided on a color theme I'm going to play with and went off the carpet in the "child sitting area" (aka bean bag central).  Those blues and purples are going to continue throughout the room when I decorate some more.

For now, the main purchases have been the little bins on the shelves with books.  Those were $5 for all 3 at Walmart.  I also bought the cusions on the sectional (should probably go back and buy more but I wanted to see if I liked them first).  Those were $21.00 for all three which is GREAT as far as cushions go.  They're really fluffy and I thought Evan would hate them but turns out he is a HUGE fan.  Guys don't so much care what thinks look like, they just want it to be practical, and his head fits perfectly on them while he's lounging on the couch reading a book with Liliana.


The only art we've placed on the walls thus far is our counting birds.  They look awfully high in this picture because it's a weird angle which is my fault.  We also do have to play them a little higher since you don't want toddler hands taking them down! (something she's already tried by standing on the rocking chair ... yikes).


As for Evan's project, I bought the fabric ... and that's as far as that has gone.  We need to make that a little curtain.  It is going to work PERFECTLY though.  We also bought a changing table, pad, and some liners instead of that play pen that's in the corner (you can only see half of it).  I'll write a post on that next week though.  It was an AMAZING deal that we got.

Liliana's already a HUGE fan of her "secret" space:


As for the wall above the couches, I have some big plans for it.  It's a HUGE wall so I needed something noticeable and what better way to do that then to show off some art work of the girls?

I'm probably going to make some prints and put those up there too.  It will be a gallery wall of sorts.  Here is the inspiration photos I've seen that make me oooh and aah. 


I'm not sure if it would look good in our room quite yet, but this looks so pretty with the different colored frames.


These last two are gorgeous.  I'm envisioning a mix of them for the playroom.  Some prints and some art.

Budget wise, we're still doing fairly well.  We've spent $27 dollars on the little "hide away" for the girls and $26 for cushions and bins.  That's $52.  We've still got more to do, but that's a pretty good job to only spent $50 going from THIS:

BEFORE 


To this ...

PROGRESS #2

PS I've added quite a few things to the etsy shop and have been having a blast creating new things!  Take a look!  The prices are SUPER cheap since I'm just starting out it's not about profit, it's just fun creating.

Wednesday, February 22, 2012

Home Renovation Project: Playroom Part I

It has been relatively slow going compared to others mini-home renovation projects, but considering that I work a full-time job, my husband literally works the equivalent of 2 full-times jobs, we have a 21 month old, and I'm 4 1/2 months pregnant, I am DARNED PROUD of the progress we've made with the Home Renovation Project.


Sure, we've really only done the livingroom, but we did it ALL for $100!  Can't beat that!

The next room on the agenda? 

I wanted to go to the playroom.  It's funny what happens when you have children.  Normally, the next bedroom would have been the master, but since we've had children, the master is used for loving, sleeping, and relaxing.  We spend the vast majority of time downstairs in our house and that's just the reality of it when you have kids.  When the kids are awake, you're playing with them! 

When we first moved in to the house, we put the playroom right off the kitchen.  It was a pretty small room but worked until we realized we hadn't put any seating in there.  That works for Liliana, not so much for us.

So we quickly moved everything over to the big room in the front of the house and put the study in the small room (see again how your house gets run over by the kiddos? haha!).  It has actually worked BEAUTIFULLY though.  Liliana ONLY has stuff in that one room and in her bedroom.  It makes our home feel like our home again, and not only her home.  I knew it was possible to manage that, and we did!  So proud of that.

Just because we moved the room though, didn't mean we were done.  The paint color on the walls was a dark green with TONS of scratches from the previous owners. 

So on President's Day, we painted.  And we painted some more.  We're still FOR SURE in the progress stage though. 

As you can see ...

BEFORE


We switched these two rooms around.  The alphabet wall room is now the study and vice versa.

On Monday night though, this is what my house looked like:

SEMI-PROGRESS (looks worse than the before huh?)


In order to paint the playroom, we had to take a ton of toys and put them in the now current study.  As you can see, we hadn't moved our alphabet wall yet.  And as you can also see, this is about 15% of Liliana's toys.  She has entirely too many for one child.  She's spoiled by family.


Here is the playroom all painted though!  We did the whole thing in a mere 3 hours, and that's pretty incredible considering this room is QUITE big and I only helped for about half of it since my pregnant belly kept getting light headed and had to leave the room twice.


Our couches (Walmart baby!) take up that entire back wall and are SO darn comfortable.  Now for the main Daddy event ...


My brilliant hubby had this great idea.  He took two book shelves that hold toys, faced them away from each other and bought a piece of MDF at Home Depot.  He primed them and I went to Hobby Lobby and bought some GREAT fabric to put in between.  It's going to be Liliana's little hide away and stage.  She's already been playing with it even though it's not done.

Best part of the makeover so far?  We've spent only $25!

The paint color (Oak Straw from Behr and trim) was left over from the living room.  The only money we spent was for the piece of MDF and for the fabric!

Stay tuned next week when I unveil how it all came together!  By tonight, those shelves will be full of toys, we'll have an official sitting area with bean bags, a more organized toy area, and a sectional to sit on to enjoy the view.  Can't wait!

PS Tomorrow is my BIG ultrasound!  It should confirm that baby #2 is indeed a girl and should give us more news on my placenta.  To say I'm anxious is an understatement.  Keep us in your thoughts!  I will definitely update as soon as I get a free moment.