Showing posts with label nursery decor. Show all posts

Tuesday, May 29, 2012

Baby Girl's Nursery Reveal!

Hi visitors from Kellys Korner!  I worked really hard on my baby girls nursery and am SUCH a big fan of it!!  I've had a few people ask where the prints on the walls are from.  I actually designed and made them myself, so feel free to go to my etsy shop.  My prints are really affordable and I love designing for people (plus, if you read other posts you'll see I'm on bed rest and desparately want something to do, haha!)

I am so excited to announce that we are DONE with baby girl's nursery! Yes, I am only 32 weeks, but considering that the hubby is about to get REALLY busy with work once again, we thought this long weekend was as good a time as any to finish and I am so glad we did. It is BY FAR my favorite room in the house. Just this morning before I left for work, I went in to the room and had myself a little conversation with Gloria asking if she liked the room.  She did, very much!   Hope you guys do as well!

As you recall, putting this nursery together has been quite an obstacle.  Here are all the parts we went through:

Part I: Starting baby girl's nursery.
Part II: The print that started it all.
Part III: Gloria's bedding.
Part IV: choosing the paint color
Part V: the layout ...
Part VI: that darn corner!
Part VII:The Crib Mobile (DIY Steps)
Part VIII: Now that's progress!
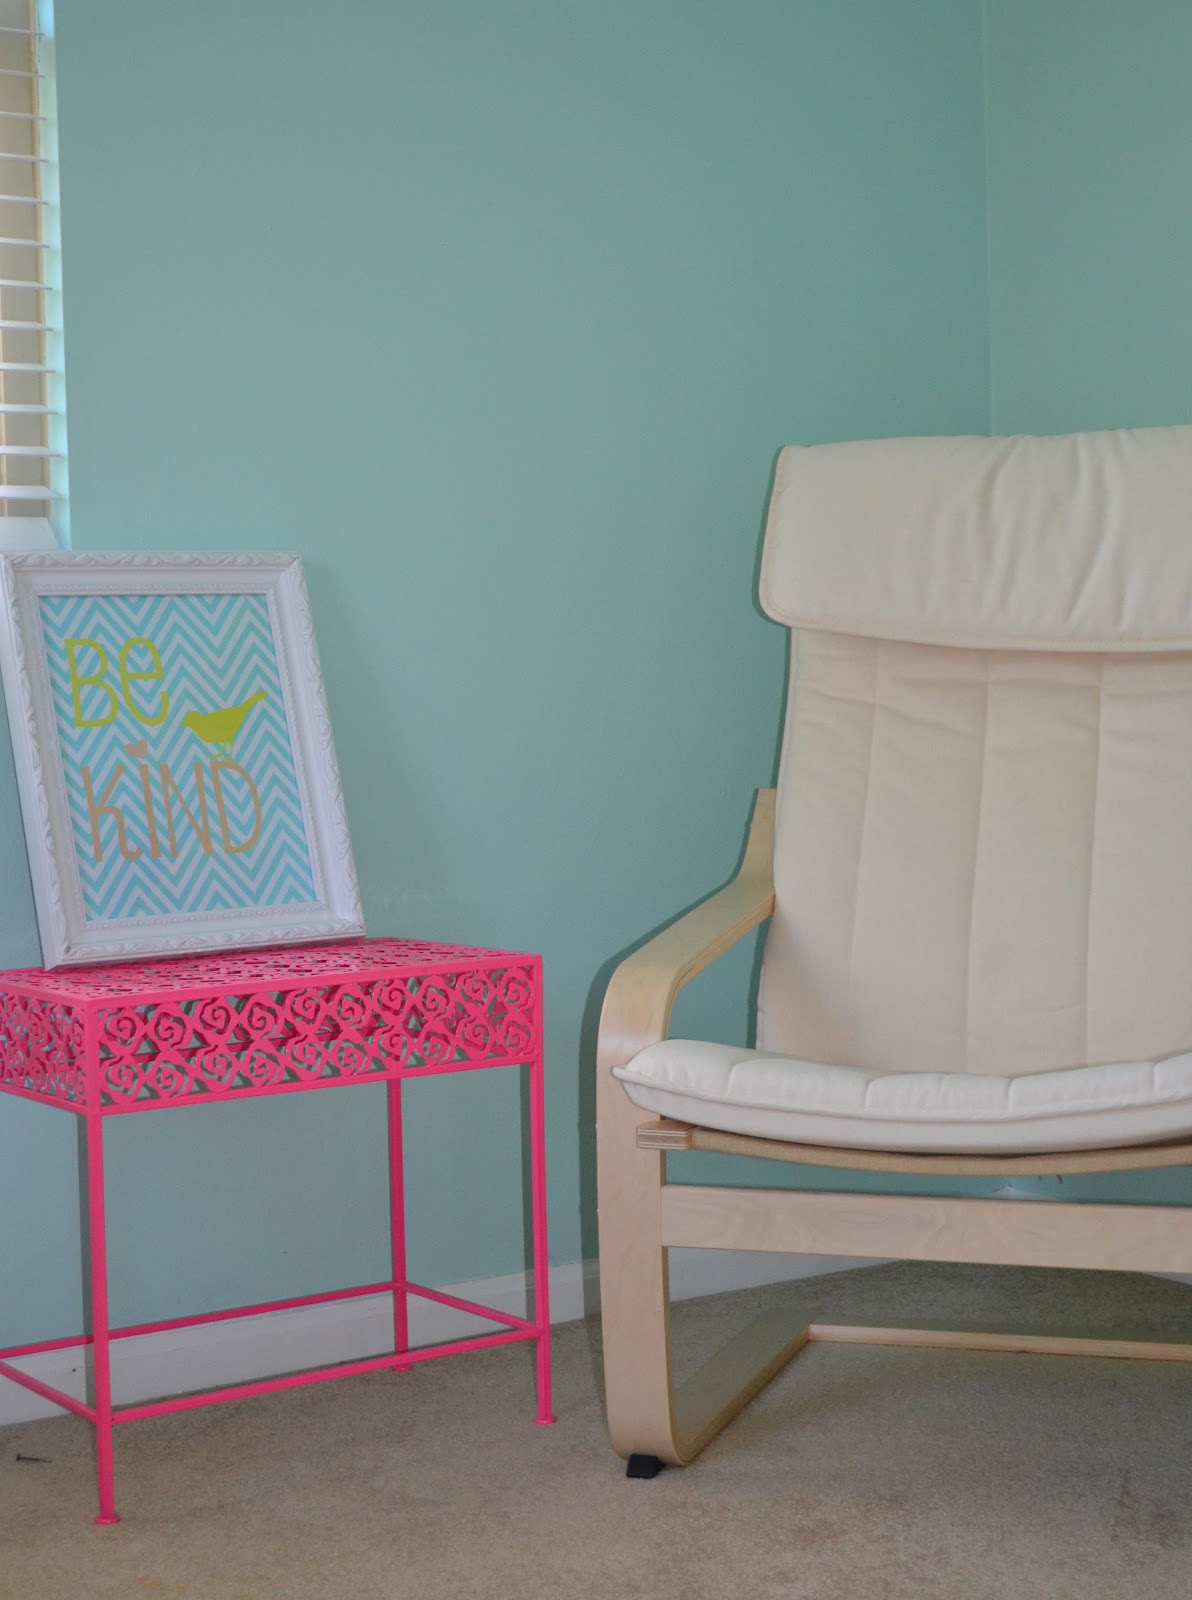
Part IX: A Special Corner for a Special Lady
Part X: DIY no sew valances
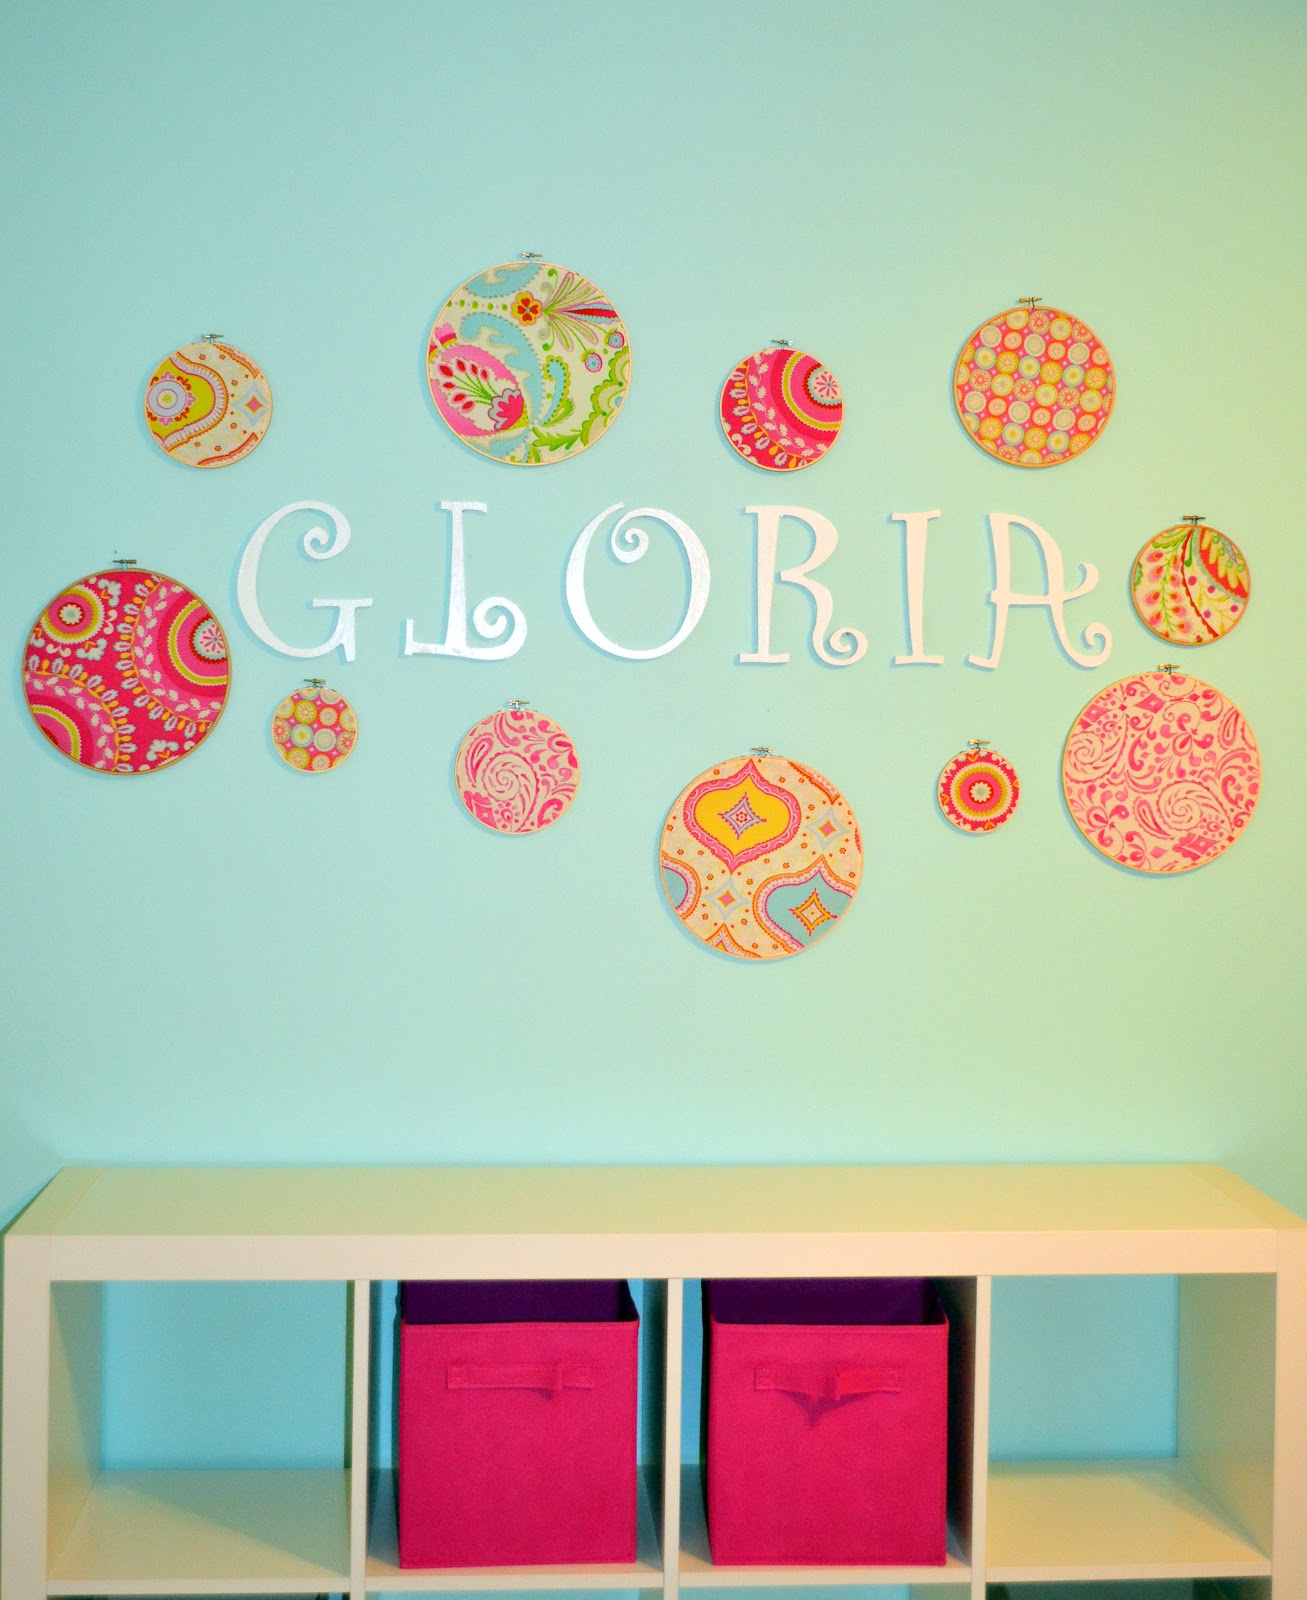
Part XI: How to Embroidery Hoop Wall.

Sources of EVERYTHING are at the bottom.  I've already had quite a few emails asking for sources, so let me know if I forget anything! 

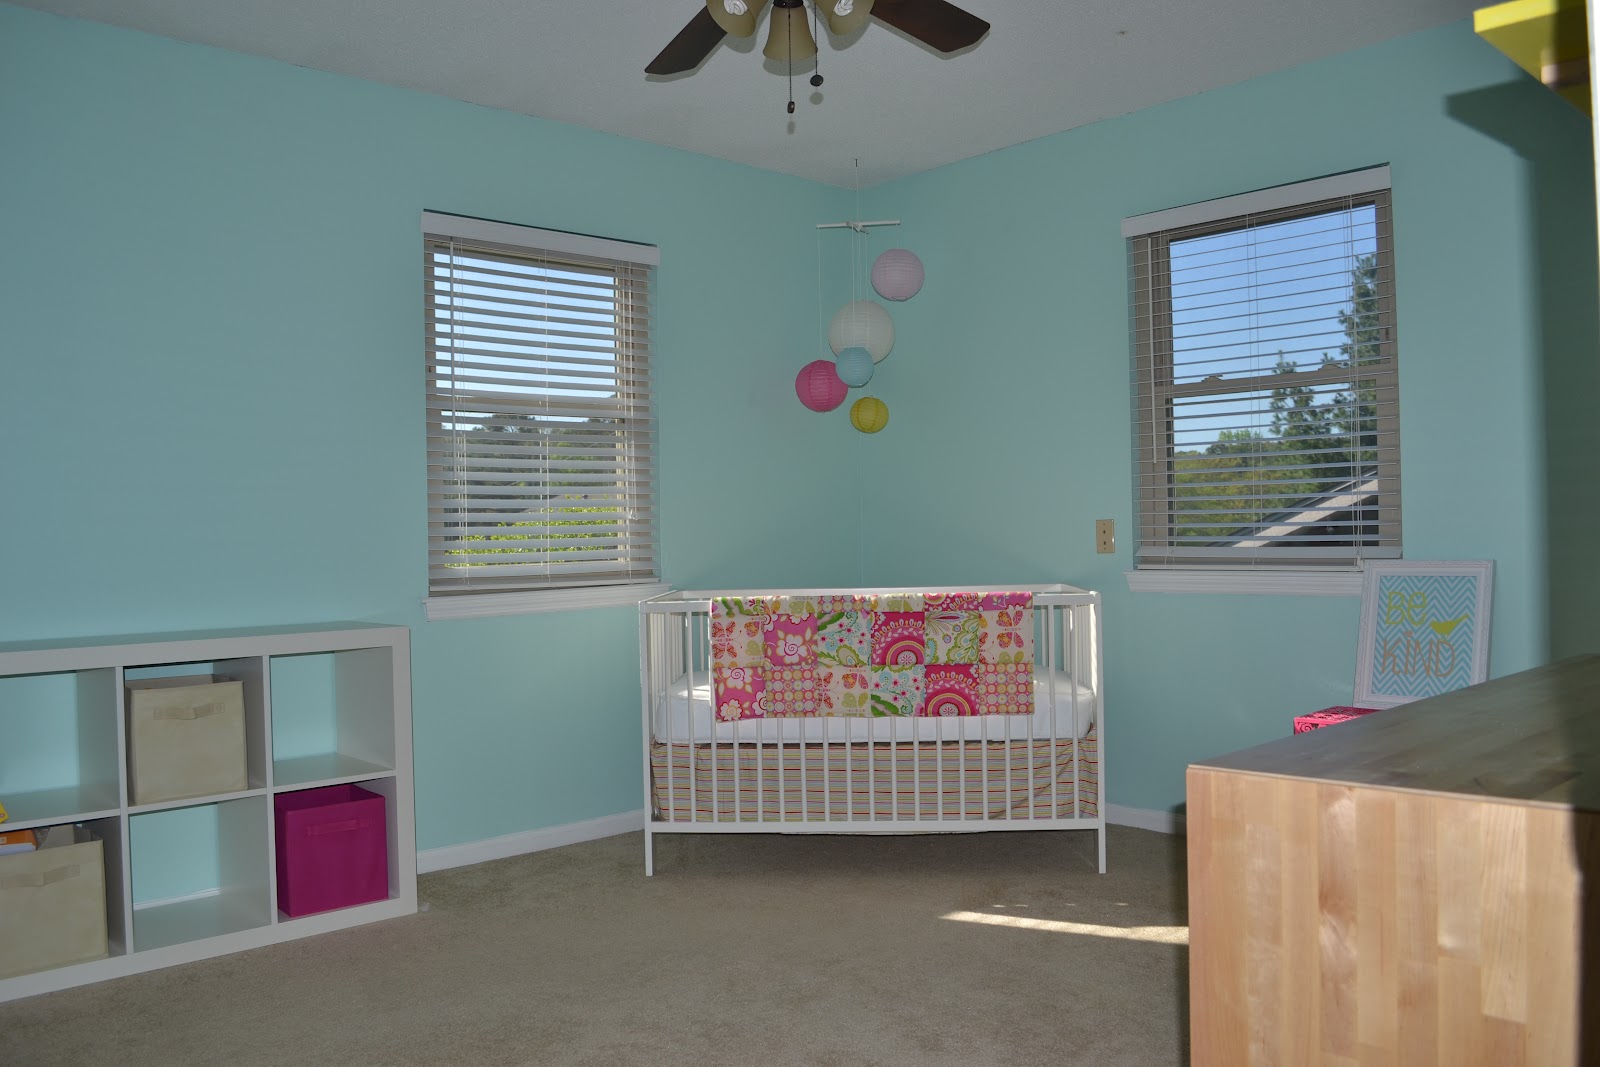
 Overview of the room

 Other side of the room

 Pretty bedding

Bedding fabrics are the "Kumari Garden Collection."  I had the bumper and blanket made on etsy.  I just used white crib sheets and bought 2 yard of fabric to make the bedskirt (aka, just laid the fabric down).  When it was all said and done, I spent $115 for the 4 piece set!  GREAT deal.

 DIY Crib Mobile

This project cost less than $15 and took less than an hour to put together.  Definitely recommended!

 More detailed views of room:

The little storage box was $15 from Walmart.  The furniture is ALL Ikea except for the pink table which is from Hobby Lobby. 

My recommendation for building a nursery is to come up with a color scheme and use something as inspiration, whether it be a pillow, fabric, or in our case, a print.  It helps make it cohesive.


 Sources for Baby Girl's Nursery:

Paint Colors: Blue is Robin's Egg Nest from Benjamin Moore.
Rug: JC Penney ($80)
Furniture: bookshelf, crib, dresser, shelves, and chair are Ikea.  Pink Table is Hobby Lobby.
Ottoman/ Pink Storage Box: Walmart ($15)
Bedding: blanket and bumper made on etsy.  Kumari Garden fabric collection.  Bed skirt is just 2 yards of fabric laid down below the mattress.  Crib sheets are just plain white crib sheets from Target.
Hoop Wall: Hobby Lobby letters painted white (gift from Grandma).  Hoop walls from Hobby Lobby (mixed 6", 8" and 10").  Fabrics from Kumari Garden Fabric Collection.
Decorations on pink table: lamp is from Target and humidifier is from Target (Crane humidifier)
Decorations on changing table: diaper caddy is from Target ($10) and sock monkey was a shower gift
Decorations on shelf #1: jewelry stand from Hobby Lobby and book ends (red and pink birds) were purchased with a Pottery Barn giftcard that I've had for 4 years and had never used
Decorations on shelf #2: glass bottles and bird cage from hobby lobby.  Books and bunny were gifts from baby shower.
Elephant on bookshelf: from Pottery Barn.
Prints and frames for "dedication" wall: elaborate one from Hobby Lobby,  plain from Michaels.  All prints made and designed by me (go to etsy shop link at top of page and contact me for any of them!)

Thursday, April 19, 2012

How To: Gloria's Embroidery Hoop Wall!

As you recall, last Thursday was/ is always my least favorite day of the year.  Fortunately, Evan got off at a really decent hour and in order to try and keep my mind off things (even though it is impossible on a day like that), we decided to 'FINALLY tackle a BIG project in Gloria's room!  The hoop wall! I had stalked pictures on pinterest about hoop walls and loved how they looked. 


While there are tons of pictures everywhere of this look, I didn't find many detailing HOW they went about doing the process.  For those that are creatively challenged (like me!) I thought it would be helpful to see it in a step by step format:

(1) In order to accomplish the look, I had to do some prep work.  First, I had swatches of quite a few different fabrics.  Etsy, Hobby Lobby, or Hancock fabrics are a good place to achieve this.  I went ahead and got all the fabrics from the Kumari Garden Fabric Collection since Gloria's bedding is made with this as well.


Hobby Lobby and Hancock Fabrics have "swatch" bundles where they do the work for you of getting ones that go well together.  I got REALLY lucky with my fabrics because the lady that's making Gloria's bumper was running a couple weeks behind and offered to send these fabrics at no cost to me to make up that tiny dilemma.  I ended up saving quite a bit of money by doing this and she kept a customer happy! ; )

(2) After getting the fabrics, then buy the hoops.  I've read that you can find them at Goodwill and truth be told, I'm rarely available during their business hours so got them at Hobby Lobby.  Either way, they're CHEAP.  I bought 11 hoops for $10.  I got a mixture of sizes, 10 inches around being the largest and 4 inches around being the smallest.

(3) Once you have the hoops, start deciding what fabrics you want in them, and where.  It's a good idea to prepare this in the room where you'll be hanging the wall art to get an idea as to how each fabric looks on your paint color.

(4) Once you've figured it out, place the fabric inside the hoop and cut around it, leaving about an inch of fabric.

(5) Then, apply good 'ol Elmers glue to the inside piece of wood and lay the fabric down to create a seal.  I put a book over them to ensure it would glue down tightly and left that for a while.

(6) next, arrange!  Take your time to figure out how you want it to look on the floor and take a picture to remind yourself where they fall.

(7) Give your hubby kisses as he patiently hangs all of it (with a tiny nail for each hoop).  Be picky about the positioning and bat your eyelashes more.

(8) Marvel at your results!


As you can see, this nursery is REALLY coming together!  The rug, some decor, and the bumpers should all  be arriving within the next couple of days.  Can't wait!

Linking to Serenity now.

Linking to Tatertots and Jello.

Linking to DIY Show Off. 

Linking to  Just us Four.


Wednesday, April 18, 2012

We've Come a LONG Way

The other day I was feeling pretty down in the dumps in terms of progress we've made on redecorating the house lately.  We have a GREAT time doing it, and it has kind of become our new weekend hobby when Evan is off of work, but I feel like our transformations are underwhelming (is that even a word?) and barely noticeable.

We still have SO many things we'd like to do to the house, but I was feeling a little unispired.  Then I looked back at the before pictures ...

And the inspiration is back!  In 3 short months, we have accomplished quite a lot in our living room, the pantry, the nursery, and the playroom (as evidenced below).  Although not one of those projects is 100% done, is a project EVER completely done?


So before we went any further, I decided to give our realtor a call.  I wanted to know if some of our possible future projects were even worth it!  I thought she would tell me I'm a crazy woman, but she told me she SO wished clients would call before doing renovations. 

She's coming over this evening and I hav esome BIG dream projects i'd like to ask her about.  It would all be DIY, of course, and I'm aware we have little time, but a girl can dream right?  And when you do it on a budget, it makes it all the more fun.  In particular, I'm going to ask her about:

(1) painting the kitchen cabinets white like this photo below (this isn't our kitchen obviously.  It's just inspiration)


(2) redoing the master bathroom (I can't even put an inspiration photo here ... because this one would be a HUGE overhaul)

and ...

(3) changing up the master bedroom (i ordered a very similar pillow off of etsy and this will be the color inspiration for the master.  We're hoping to get some work started on the master before Gloria comes along)


It's exhausting, yet exhilaring, how these projects are never ending!  I have thoughts in just about every square inch of the house.  But don't worry, I still took the time to sit down and be sorely disappointed in last nights Glee instead of worrying over this.  Some of it will get done and some of it won't.  It just depends when inspiration strikes!

Tuesday, April 17, 2012

DIY Step by Step No Sew $8 15 minute Valance!

The last couple of days, Evan and I have become quite the connoisseurs when it comes to making valances. The only problem, originally, is that we had no idea how to make them.  But with a little bit of brain power, patience, and some adhesive tape, we now have two gorgeous valances hanging in Gloria's room!


Each valance ended up costing only $8!  I saw some on etsy that I really liked, but they were $35 each and I thought "I can make that!"

Well, here's the ONE tricky part: I don't own a sewing machine.  Sure, I could buy one, but the cheap in me started getting creative.

So if you have 15 minutes, $8, don't want to sew, but need a cute window treatment?  This DIY project is for you!

Here is a step by step run down of how to make it happen.

DIY No Sew Valance


(1) First, go to the fabric store and get one yard of fabric.  If you can, get them to cut it for you (might as well right?) to the dimensions you need.  Our windows were about 35 inches wide so we had them cut the fabric 32 by 40 to make the valances approximately 15 inches long.

(2) Lay the fabric out, apply adhesive tape on two ends (where it measures 40 inches), and press down just to secure it.


(3) Next, apply adhesive to the bottom end.  Remove the adhesive sticker (like you did above), but do not apply fabric to it just yet.


(4)  Next, fold the other side over and you are essentially going to make the fabric stick so that you could stick your hands completely through it.


(5) Keep toddler as entertained as possible while trying to explain to her that this project is not for her to play with (aka "Liliana, stay off the fabric!!!")


(6) Fold the fabric over to your desired length (ours was 15 inches) and have adhesive to the rest.


(7) Iron it all to make the adhesive permanently stick.  This takes no time at all.  HINT: if you are doing two curtains, it is a good idea to make sure they match and are the same size BEFORE ironing (learned that one the hard way).


(Big pregnancy belly pic!)

(8) Place your new curtains on the rod and marvel at the finished, fast, cheap product!!


What a difference these valances make!  For only $16 dollars, the room went from THIS


 to ... this!


PS You might notice a couple fabric swatches in hoops on the left wall ... that's another project that I plan on posting about!  Gloria's nursery is really coming together!

Linking to Serenity now.

Linking to Tatertots and Jello

Linking to DIY Show Off.

Tuesday, April 3, 2012

A Special Corner for a Special Lady

Lately I've been walking by Gloria's nursery with a gigantic smile on my face.  Sure, it's because I'm nearly 24 weeks (t-shirt project coming on Thursday), because I'm still feeling relatively great, and because I see the nursery coming together, but mainly it's because I finished the most special corner in the nursery.

You probably think I'm talking about the crib mobile that I fretted over for an entire week without giving up until we had our great result.  But no ... it was my wall for the first Gloria, my Tata.

We chose the name Gloria for our daughter because of my Tata (my grandmother).  Tata was SUCH a unique and special woman.  I want to have memories to show Gloria one day the outstanding woman that she's named after.  While Tata never made it to our wedding (she passed our sophomore year of college), she insisted on dressing up (and matching if you notice!) and taking pictures with us for prom. Evan and I were SO thrilled to have this picture with her and I knew it needed a special place in the room. I just didn't know HOW I would incorporate it.


The inspiration struck. 

A couple weeks ago , I emailed family and asked friends on facebook to give me adjectives to describe our wonderful Tata.  I got a great response!  Most of them said "kind, generous, giving" and of course, my brother gave me a couple funny ones: "arroz, mofongo."   You see, those are Puerto Rican dishes and my Tata could COOK! 

Once I compiled my favorite 5 adjectives (Evan and I chose two of them and let the family pick the other 3), I got to work designing. 

I found one print that I liked on etsy and then recreated it  myself (sorry, but it saved me $15 dollars doing that).  Then I used that one as inspiration and went Chevron crazy. 

The result ...

a special corner paying homage to a VERY special lady.


Why we chose these words ...


Be Kind: Tata was SO very kind.  She loved EVERYBODY that she met and everybody felt the same way in return.  Tata lived with us for about 4 years when she was really sick (she had liver cancer).  In that time, she became best friends with every single person, including our neighbor, the cleaning lady, the postal man, etc.  It's who she was: everybody adored her.  Connie (our neighbor) and Tata had a system where Tata would open her blinds when she felt well enough and Connie would just come on over to say hi.  Tata had that effect on people.  She made everybody feel welcome and fortunate to be with her.

Be Selfless: My aunt and cousin suggested this word and it is SUCH a good word.  Tata thought about everybody else first.  And if someone ever said they were sad about something, or missed something, she would do just about anything to ensure they had it.  Case in point: one of our family members from Puerto Rico was chatting with her on the phone once and just happened to mention that he was craving an orange.  The next day, Tata went to the grocery store in TEXAS, got 6 oranges, and paid $17 to have the oranges shipped to Puerto Rico!  Mind you, Tata was not a wealthy woman AT ALL.  She worked in factories her entire life and didn't even go to high school.  But she was SO giving and though these oranges probably were spoiled by the time they got to Puerto Rico, it shows the woman she was.


I did three words in Spanish since we're raising our children to be bilingual. 

Sea carinosa (be caring): Tata was SO very caring.  She couldn't sit next to somebody without wanting to hold their hand, carress their back, or just give lots of kisses.  Within a week of meeting Evan, she was ALWAYS taking his hand.  They loved each other so much and I'm so glad they got to meet each other for a few years.

Sea Generosa (be generous): Like I said before, Tata was not a rich woman at all.  She worked two jobs and so did my Grandpa just to get my Mom and aunt through school.  She would leave the house at 4 am everyday just to help provide for a family.  That being said, she was SO very generous with what she did have.  She had this nasty habit of giving everyone $20.  I can't count how many times I would be taking my jeans off in the evening and would notice she had slipped a $20 bill in my back pocket!  She did it to Evan all the time too. He would try his darndest to notice so that he wouldn't take her money, but like I said, this is who she was.  In other words, she was the opposite of a pickpocket.  ; )

Sea Dulcesita (be a sweety): My Mom gave us this word and it was the one Evan wanted on the wall.  It does describe her beautifully.  She was SUCH a sweet lady.  She had the brightest blue eyes you've ever seen and wanted to feed EVERYONE.  If you told her "I feel like pancakes Tata!" she would have a dozen ready for you in two seconds.  She made me cremita (a kind of oatmeal) EVERY SINGLE morning and had it waiting for me before I went to school.  In other words, she woke up every day just to make me this.  I often am angry at myself for not always eating it and just running out the door instead, or for not thanking her more often for it. 


ALL of these adjectives describe her perfectly and they're what I want Gloria to be: kind, selfless, generous, caring, and a total sweety.  I have a feeling she will be this and more.

Tuesday, March 27, 2012

Gloria's Nursery: Now THAT is Progress!

We are finally seeing some progress on Gloria's room!  As I've said a few times, we took full advantage of our week of vacation and tried to get a good deal done.  What kinds of things happened this week?

Well, let's just say we did enough to have renovation update posts on the home all week long!  But for a more detailed analysis, here we go: we planted two new trees; mulched the front and back yard; put frost on a window right by the door; made the collage wall, put up prints, and painted the girls names on the bookcases in the playroom (playroom progress post coming this week); installed a new lantern and flood light in the backyard to give us more light; made a semi-new hot tub cover so that the golden retriever won't keep chewing it; painted the pantry (post coming for that some time this week); AND we made great progress on Gloria's room. 

WHEW ... just typing that all out made me exhausted!

As for the progress on Gloria's room?  Here is it BEFORE Spring Break:


And here it is this morning:


You can't notice TOO many differences, but I promise they're there ...

For starters, I got the fabric for the bed skirt and in this picture, it's just lying in the right spot.  Evan says I should screw the sewing and leave as is.  I don't plan on doing that, but I must admit it's tempting! ; )

We built the paper lantern crib mobile as I posted about yesterday and the next day went out and bought the storage for the bookcase.  We bought others as well but decided the plain ol' khaki was necessary since I have plans for the wall that will brighten the day some.

You'll also notice we finally have a mattress!  Poor Gloria, she got the cheapo Munchkin $50 mattress but really and truly? Do they know the difference when they're tiny?  Along the wall on the right you'll notice a few differences ... a print that says Be Kind, a table, and some yellow shelves along the wall.

I found this print on etsy weeks ago and decided to use it as the main color scheme of the room.  The cheapo in me thought "I could make that!" so instead of paying $15, I just made it myself in less than an hour! SCORE!  I bought the cute little table on sale at Hobby Lobby when I was getting frames for the playroom and those shelves came from Ikea but were painted yellow over spring break. 


Here's a close up of the table.  It's adorable.  The print will NOT be staying right there.  It will be going up on the wall with a WONDERFUL project that I have planned in honor of my Tata (Gloria's namesake).  I'll hopefully get that project finished by the end of the weekend and can't wait to post all about it.


Here's a close up of the print.  I am still just as in love with it as the first day I saw it.


Here are the cute yellow shelves!  I wanted to bring in some pops of color and accomplished that with the table and shelves.  Painting these shelves wasn't easy because the shelves we bought from Ikea were pretty sealed already.  I should have used primer looking back on it, but oh well ... 3 coats did the trick. ha.  I'm still not entirely sure what will go on these shelves, but that's another project for another day.


Here's another view.  That CUTE clock is from Target and was $6!  We'll be putting it up in the corner wall some time ... really, pure laziness that we haven't yet.  Then again, I also have a bag of stuff to return to Target just sitting on my couch right now, so laziness is just kinda the name at this stage in life.

I am SO darn pleased with how this room is coming along so far!  Seriously, it's my favorite room in the house.  That being said, we still have SO SO SO much to do.  To name a few: buy a rug, do a hoop wall with swatches and Gloria's name painted on the wall above bookcase, do the project honoring Tata on wall behind rocking chair, put stuff on shelves, buy a lamp, etc.  I want it DONE by the time I'm 34 weeks since I know I deliver my babies early.  Thank goodness I'm only 23 weeks along! : )